Wednesday, January 18, 2012

Status Update

Just a little photo update of what I have been up to as of late.


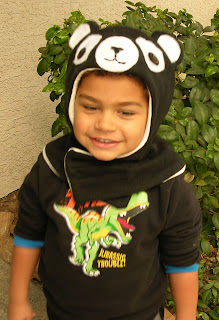
 I made these panda and penguin balakavas for the nieces and nephews. Some have yet to ship... will be SOON.


Thanks to some inspiration from my dear friend Myra, I designed a new Princess Cape for the shop :)


Helped my grandmother make these booties for my cousin's baby shower parting gift. We decided these would be adorable to add to the shop, as well.


Made a new Buttoned Envelope Clutch. I'm loving it. I promise it buttons, even though it is not shown buttoned. Small oversight on my part... silly photography!


Added a new photo of the Happy Birthday Banner. I just love how bright and cheery it is.

I'm often late, but it is still appropriate to give thanks!

theartsygirlconnection.com had a lovely post awhile back and on top of all the great content she posts, she named me as one of the fifteen blogs that inspire her. I couldn't be more surprised and elated. Thank you so much, Marilyn! You totally inspire me, too!

Friday, January 13, 2012

The Mommyhood Chronicles Little Bird Threads Review and Giveaway!

 I am so honored to have The Mommyhood Chronicles reviewing my capes! YAY!!! She is also hosting a few giveaways worth checking out. Please check out her blog and sign up to win :)

the mommyhood chronicles: Personalized Kids Hooded Towel/Cape Giveaway/Revie...: I am so excited to bring you this awesome review/giveaway from Little Bird Threads . If you know me, you know I absolutely love etsy. When ...

Friday, January 6, 2012

Hawaiian Dreamin' or How to sew a Pua'u

Until recently, I had no idea that hula dancing was done in anything but a grass skirt. Then, I received an order for a Pua'u (pronounced paw u). I tried searching Google for some instructions. Instead I found some really random answers to how to sew a Pua'u. That is when I decided to go about it on my own.


First, I measured the waist and length of the little girl. I then cut material to five times the waist measurement (plus seam allowance) and exact length (plus seam allowance). Then, I folded the material in half width wise and pinned it together to be sewn along the width of the fabric only.  


Turned it inside out.


Ta da!


I then sewed six channels 3/4" apart across the width of the skirt and inserted 1/2" elastic (measured to the waist of the girl plus 2") into every other channel starting with the second channel.


Once the elastic was inserted and sewn down the side, I folded the fabric in half and used a french seam to sew together and finish the skirt. You can see it being worn below. Super cute, right? I think it would make a super darling skirt to just wear around.